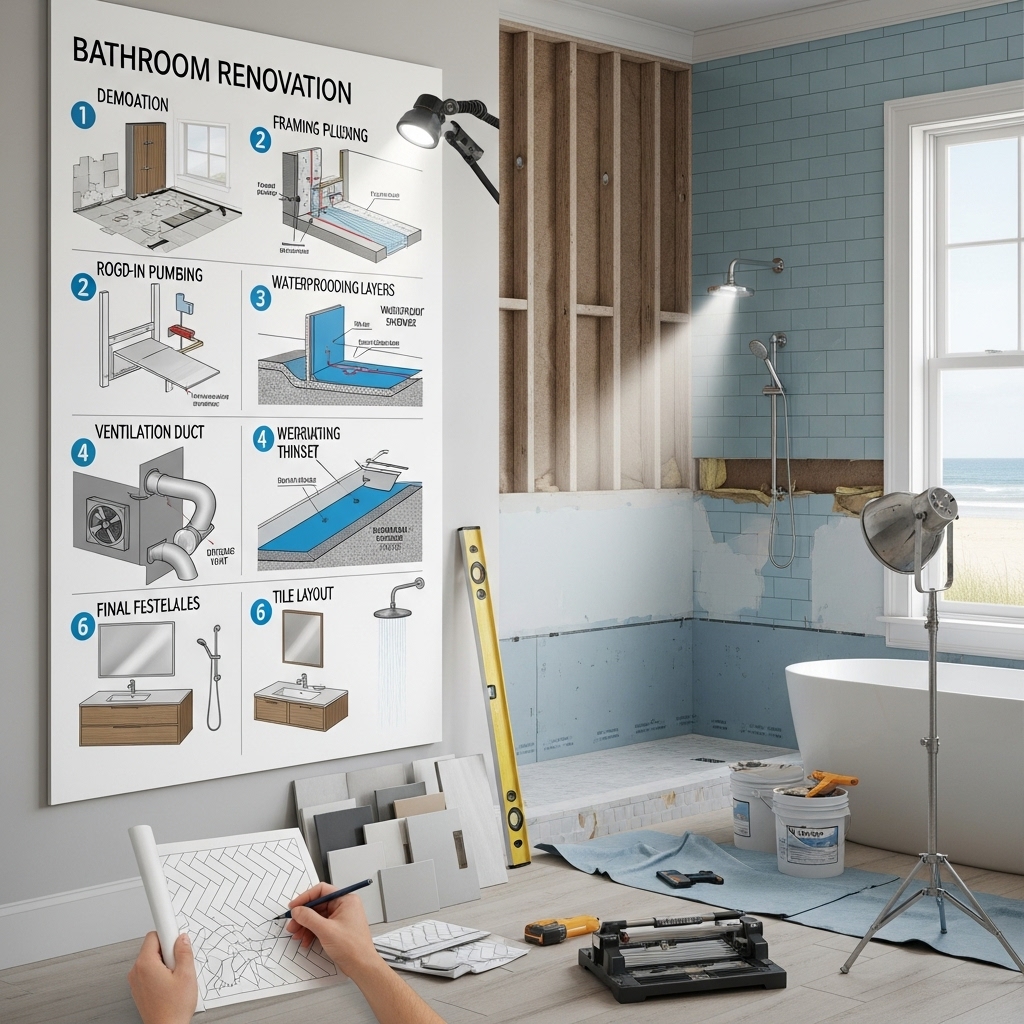
The Bathroom Remodeling Process in Huntington Beach, Step by Step
A great bathroom is the product of careful planning, precise execution, and a process that respects your home and routine. In Huntington Beach, the coastal climate also shapes decisions around materials, ventilation, and waterproofing. The following roadmap walks you through each stage—from the first conversation to the final towel bar—so you know what to expect and how to prepare. At the outset, it helps to consult professionals experienced in coastal bathroom remodeling who can anticipate challenges and streamline your project.
1. Discovery and Vision
This is where you define goals, outline constraints, and share inspiration. Talk about who uses the space, storage needs, lighting preferences, and accessibility considerations. Discuss the look and feel you want—calm coastal tones, bold patterns, or a spa-like retreat.
- Identify pain points: poor lighting, lack of storage, cramped layout.
- Gather images that reflect the vibe you want.
- Note any must-haves, like a curbless shower or extra vanity drawers.
A productive discovery phase sets the foundation for design decisions that follow.
2. Site Measure and Existing Conditions
Accurate measurements prevent surprises. Your team documents wall lengths, ceiling height, window and door locations, and plumbing and electrical points. In older homes, it is common to find out-of-plumb walls or non-standard framing; accounting for these early helps refine design and installation methods.
- Confirm venting routes for exhaust fans to the exterior.
- Evaluate floor structure for potential curbless shower conversions.
- Check access for materials and debris removal to protect adjacent areas.
With a precise understanding of the space, you can model realistic layout options.
3. Concept Design and Layout Options
Design begins with options. You may review two or three plans that solve the same problems in different ways. Each option should address circulation, storage, and natural light, with a clear rationale for fixture placement.
- One-wall layouts for efficiency and open floor area.
- Glass partitions to maintain light into the room.
- Floating vanities to lighten the visual footprint and ease cleaning.
At this stage, the best solution usually reveals itself through a balance of function and aesthetics.
4. Selections and Specifications
Finish selections bring your concept to life. The process covers tile, counters, cabinetry, plumbing fixtures, lighting, mirrors, hardware, and paint. In coastal environments, prioritize materials proven to withstand humidity and salt air.
- Choose tile and grout for floors, walls, and niches.
- Pick vanity style, finish, and storage configuration.
- Specify plumbing trims and shower configurations.
- Design lighting layers and switching for flexibility.
- Finalize mirrors and accessories that complete the look.
Document everything in a specification schedule so ordering and installation are straightforward.
5. Technical Planning and Permitting
Technical details ensure the bathroom works as beautifully as it looks. Your team confirms waterproofing systems, ventilation sizing, and electrical requirements. They also prepare permit documents and coordinate inspections with local authorities.
- Define shower slopes, drain types, and membrane details.
- Plan for GFCI protection and dimming schemes.
- Locate blocking for grab bars, doors, and accessories.
Permits and inspections protect safety and quality, aligning your project with local standards.
6. Pre-Construction Logistics
Before demolition, logistics keep the site safe and your household running. The team sets working hours, identifies a staging area for materials, and installs protective coverings. They also confirm lead times and delivery windows.
- Protect floors and adjacent rooms with coverings and dust barriers.
- Stage tile, fixtures, and cabinets in a dry, secure location.
- Review the schedule and key milestones one more time.
A prepared site makes for efficient, lower-stress construction.
7. Demolition and Rough-In
Demolition removes existing finishes and reveals framing, plumbing, and electrical conditions. Rough-in work follows: new lines are run, valves set to specified heights, and electrical boxes positioned according to the plan.
- Inspect for moisture damage and correct as needed.
- Verify walls are plumb and square to support clean tile lines.
- Confirm niche locations and blocking before closing walls.
Progress photos at this stage create a helpful record for future reference.
8. Waterproofing and Substrates
Waterproofing is the quiet hero of a long-lasting bathroom. Membranes, proper overlaps, and attention to corners and penetrations ensure water stays where it belongs. Floors are sloped to drains, and curbless showers receive special attention to transitions.
- Use approved waterproofing systems for showers and wet walls.
- Install backer boards rated for wet areas.
- Seal seams and changes of plane with compatible products.
This step protects finishes and framing and reduces maintenance over time.
9. Tile Setting and Finishes
Tile layout is where precision shines. Installers dry-fit patterns, align grout lines, and center niches to create a balanced, refined look. Large-format porcelain on floors and walls can make the space feel bigger and calmer.
- Maintain consistent grout joints and clean edges.
- Use durable grouts and sealers appropriate for the application.
- Coordinate thresholds and transitions to adjacent flooring.
As tile progresses, cabinetry and countertops are prepared for installation.
10. Cabinetry, Countertops, and Fixtures
Vanities, linen towers, and countertops are installed and scribed to fit. Plumbing trims, shower systems, and accessories follow. Mirrors and lighting complete the space and establish the daily usability you envisioned.
- Check door and drawer alignment and smooth operation.
- Test for leaks and verify water temperature and pressure.
- Install accessories at ergonomic heights and confirm placements.
With finishes in place, the bathroom begins to reflect the final design.
11. Glass, Caulking, and Detailing
Custom glass is measured precisely and installed with corrosion-resistant hardware. Caulking at changes of plane accommodates minor movement and keeps lines crisp.
- Use silicone where flexibility is required.
- Inspect glass reveals and hardware alignment.
- Clean and seal as needed for a polished result.
A methodical approach here ensures both performance and a refined appearance.
12. Final Walkthrough and Orientation
Before closing the project, you and your contractor review the bathroom together, note any touch-ups, and verify that all systems operate correctly. You will also receive guidance on care and maintenance to protect finishes in a coastal environment.
- Complete punch list items promptly.
- Provide product documentation and maintenance tips.
- Schedule a follow-up check if desired.
This final step transitions you from construction to enjoyment.
Mid-Project Course Corrections
Even the best plans benefit from a midpoint review to confirm details and adjust for unforeseen conditions. This meeting is an opportunity to verify niche sizes, tile heights, and fixture placements before finishes are locked in. If you want experienced input during these checkpoints, collaborate with a team skilled in bathroom remodeling to keep the project aligned with your goals.
FAQ
Q: What makes the coastal environment important to the process?
A: Salt air and humidity influence material choices, hardware finishes, and ventilation requirements. Accounting for these early extends the life of your bathroom.
Q: Can a curbless shower fit in a small bathroom?
A: Yes, with proper floor preparation and slope, a curbless design can enhance accessibility and visual spaciousness.
Q: How do I minimize disruption during construction?
A: Define working hours, staging areas, and cleanup routines. Protect adjacent spaces and keep selections finalized to reduce delays.
Q: What documentation should I expect?
A: Plans showing layouts, heights, and selections; schedules with milestones; and specifications covering materials and installation methods.
Q: When should I schedule glass measurements?
A: After tile is complete and verified; precise measurements ensure a tight, clean fit for enclosures or panels.
Begin Your Huntington Beach Remodel
A clear process turns vision into reality. By following a structured path—discovery, design, technical planning, permitting, and disciplined construction—you set your project up for success. When you are ready to move from ideas to action, partner with specialists who deliver elevated bathroom remodeling experiences and enjoy a space tailored to coastal living.